
The Complete Grow Guide
Welcome to Growtocol’s Complete Cannabis Grow Guide, your all-in-one resource for learning how to cultivate healthy, high-quality cannabis from seed to harvest. Whether you’re a first-time grower or an experienced cultivator looking to improve your results, this guide will walk you through every essential aspect of the growing process. You’ll learn how to properly set up your grow space, choose and optimize your lighting, create and maintain the ideal growing environment, and apply proven plant training techniques to maximize canopy development and yields. We’ll also cover every stage of harvesting, including knowing when to harvest, proper drying and curing methods, and long-term storage to preserve potency, terpene content, and overall flower quality. By the end of this guide, you’ll have the knowledge and confidence to build an efficient grow, avoid common mistakes, and consistently produce exceptional cannabis harvests.
Introduction
Growing exceptional cannabis is both an art and a science. After more than 10 years of hands-on cultivation, I’ve developed a deep passion for understanding what makes a plant thrive, from genetics and environmental conditions to nutrition, lighting, training, and plant health.
Growtocol was created to share that knowledge with other growers, completely free.
This guide is designed to take you beyond simply following a feeding schedule or copying someone else’s grow. Instead, you’ll learn the science behind successful cannabis cultivation and how to use measurable factors such as PPFD, DLI, VPD, pH, and EC to create an environment where your plants can reach their full potential.
From choosing the right genetics and setting up your grow room to mastering every stage of the plant’s life cycle, diagnosing deficiencies and diseases, managing pests, and avoiding common mistakes, this guide brings the most important aspects of cultivation together in one place.
Whether you’re growing your first plant or have been cultivating for years, the goal is the same: give you the knowledge and tools to grow healthier plants, produce higher-quality flowers, and become a more confident and capable grower.
I’ve spent years learning through research, experimentation, successes, and failures and I created Growtocol so that you can benefit from that experience without having to figure everything out on your own.
Learn the science. Understand your plants. Master your grow.
Genetics, Equipment, and Optimal Setup
Getting Started
A successful grow starts with the right foundation. Learn how to select quality genetics, choose the essential equipment, and build an optimized growing environment that gives your plants the conditions they need to thrive. From your first setup decisions to dialing in your grow room, this section will help you start your cultivation journey with confidence.
Choose Your Genetics
Choosing the right genetics is one of the most important decisions a grower can make, as a plant’s genetic potential determines its vigor, yield, potency, terpene profile, disease resistance, and overall flower quality. Even with perfect lighting, nutrition, and environmental conditions, poor genetics will always limit the final result.
Choose Your Equipment
Choosing the proper equipment is essential for creating an efficient and productive grow environment. Selecting the right grow light for your space, along with properly sized inline fans, circulation fans, and ventilation equipment help maximize plant health, growth, and overall flower quality.
Optimize Your Setup
Proper equipment placement, strategic ventilation, and correctly directed airflow throughout the canopy help eliminate hot spots, strengthen plant structure, regulate temperature and humidity, and reduce the risk of mold and pests. By optimizing how air moves through both the grow tent and the plant canopy, you ensure a stable environment for your healthy plants.
Choosing The Right Genetics
Genetics determine a plant’s potential for yield, potency, terpene production, growth structure, flowering time, and resistance to stress, meaning no amount of perfect lighting, nutrition, or environmental control can overcome poor genetics. Starting with proven, high-quality genetics gives your plants the best opportunity to reach their full potential.
maintain a perfect environment
Essential Tools
A successful cannabis grow is built on precision, and tools like a pH pen, EC pen, PAR meter, and temperature/humidity controllers provide the data needed to make informed decisions. By monitoring the root zone, nutrient strength, light intensity, and environmental conditions, growers can create a fully dialed-in grow environment that maximizes plant health, growth, and yield.
pH Meter
A pH pen is a digital meter that measures the acidity or alkalinity of water and nutrient solutions, ensuring cannabis plants are fed within the optimal pH range. Different nutrients become more or less available at different pH levels, so maintaining the correct pH helps maximize nutrient uptake and supports healthy, vigorous plant growth.
EC Meter
An EC pen is a digital meter that measures the electrical conductivity (EC) of a nutrient solution, indicating the total concentration of dissolved mineral nutrients available to the plant. By monitoring EC, growers can ensure plants receive the proper nutrient strength throughout each stage of growth, helping prevent nutrient deficiencies.
PAR Meter
A PAR meter is a device that measures the amount of photosynthetically active radiation (PAR) reaching the plant canopy, allowing growers to accurately assess the light available for photosynthesis. By measuring light intensity, growers can optimize fixture height and output to ensure cannabis plants receive the appropriate amount of light.
Controller
Environmental Controllers monitor and change the environment, allowing growers to maintain the ideal conditions for each stage of growth. By tracking temperature and relative humidity, growers can manage transpiration, nutrient uptake, disease prevention, reducing the risk of mold, mildew, heat stress, or slowed development.
|
pH Pen
|
Cost
|
Rating | Comments
|
Purchase |
|---|---|---|---|
|
Bluelab pH Pen |
$90 |
4.4 | Best overall option |
|
|
Apera AI209 |
$50 |
4.4 | Recommended Option |
|
|
Vivosun pH Pen |
$9 |
3.8 | Best Budget Option |
|
|
EC Meter
|
Cost
|
Rating | Comments
|
Purchase |
|---|---|---|---|
|
Bluelab Truncheon |
$90 |
4.4 | Best overall option |
|
|
Apera EC20 |
$50 |
4.4 | Recommended Option |
|
|
Honeforest TDS Meter |
$9 |
3.8 | Best Budget Option |
|
|
PAR Meter
|
Cost
|
Rating | Comments
|
Purchase |
|---|---|---|---|
|
Apogee MQ-500 |
$550 |
4.5 | Best overall option |
|
|
Photone Phone App |
$0 |
4.9 | Recommended Option |
|
|
AH-Quantuv PAR Meter |
$65 |
4.4 | Best Budget Option |
|
|
Controller
|
Cost
|
Rating | Comments
|
Purchase |
|---|---|---|---|
|
AC Infinity Controller AI+ |
$140 |
4.5 | Best overall option |
|
|
AC Infinity 69 Pro+ |
$100 |
4.5 | Recommended Option |
|
|
AC Infinity 69 Pro |
$90 |
4.5 | Best Budget Option |
|
Setting up your foundation
Required Equipment
Growing premium cannabis starts with the right equipment. While you don’t need a commercial-scale setup, having the essential tools to provide proper lighting, airflow, environmental control, and nutrient management creates the foundation for healthy, vigorous plants and consistently high-quality harvests.
Provide a controlled environment for cannabis cultivation.
Most important piece of equipment. Better light = Better Results.
Remove heat, humidity, and stale air from the environment.
Remove the strong odors produced by cannabis by passing air through activated carbon.
Prevent hot and humid stagnant areas. reducing the risk of mold, mildew, and pests.
direct airflow between inline fans, carbon filters, and exhaust points.
Choose between Soil, Coco Coir, and Deep Water Culture (DWC)
Choose your grow container type such as Fabric, Air, Octopots, and Autopots.
Provide essential macro and micronutrients needed to support vigorous growth
Combine water, nutrients, and supplements into a homogeneous solution.
Automate and remotely control equipment such as lights, fans, humidifiers, and pumps.
Make clean, precise cuts when trimming, pruning, and harvesting.
balling out for big buds
Optional Equipment
While they may not essential to get started, optional equipment can significantly improve your grow environment and make cultivation more consistent. Tools like dehumidifiers, humidifiers, air conditioners, heaters, and environmental controllers help maintain ideal conditions, reducing plant stress and promoting healthier, more vigorous growth throughout the entire grow cycle.
Increase humidity and control Vapor Pressure Deficit (VPD) for optimal growth during every stage.
Decrease humidity and control Vapor Pressure Deficit (VPD) for optimal growth during every stage.
Improve efficiency, reduce manual labor, and maintain optimal moisture levels for vigorous growth.
Support heavier ventilation and maximize grow space in negative pressure environments.
Lower air temperature and control Vapor Pressure Deficit (VPD) for optimal growth during every stage..
Raise air temperature and control Vapor Pressure (VPD) for optimal growth during every stage.
Quickly clean up spilled medium, standing water, and plant debris reducing risks of pests and mold.
Improve germination rates providing a high humidity environment.
Support and spread branches, creating an even canopy.
Bend and redirect branches, creating a wider, more even canopy.
Prevent stems from bending or breaking from bud weight.
Improve germination using seed starters like Rapid Rooters, Root Riot Cubes, and Rockwool Cubes
Agitates and aerates nutrients to keep fertilizers evenly suspended, and reducing manual mixing labor
Automatically monitors and adjusts the pH of nutrient solutions, helping maintain the ideal range.
Provide safe, convenient power to grow equipment when outlets are not within reach.
Mist seedlings, clones, and foliage or apply foliar nutrients and pest management solutions.
perfect your environment
Optimal Grow Room Setup
Before your plants ever begin growing, proper setup lays the foundation for a successful harvest. We’ll teach you how to establish the ideal airflow pattern for consistent temperature and humidity, fill your pots with the correct amount of soil, coco, and perlite to promote healthy root development, and hang your grow light at the proper height and intensity to maximize photosynthesis while preventing light stress. Getting these fundamentals right from day one creates the optimal environment for vigorous growth, healthier plants, and bigger yields.
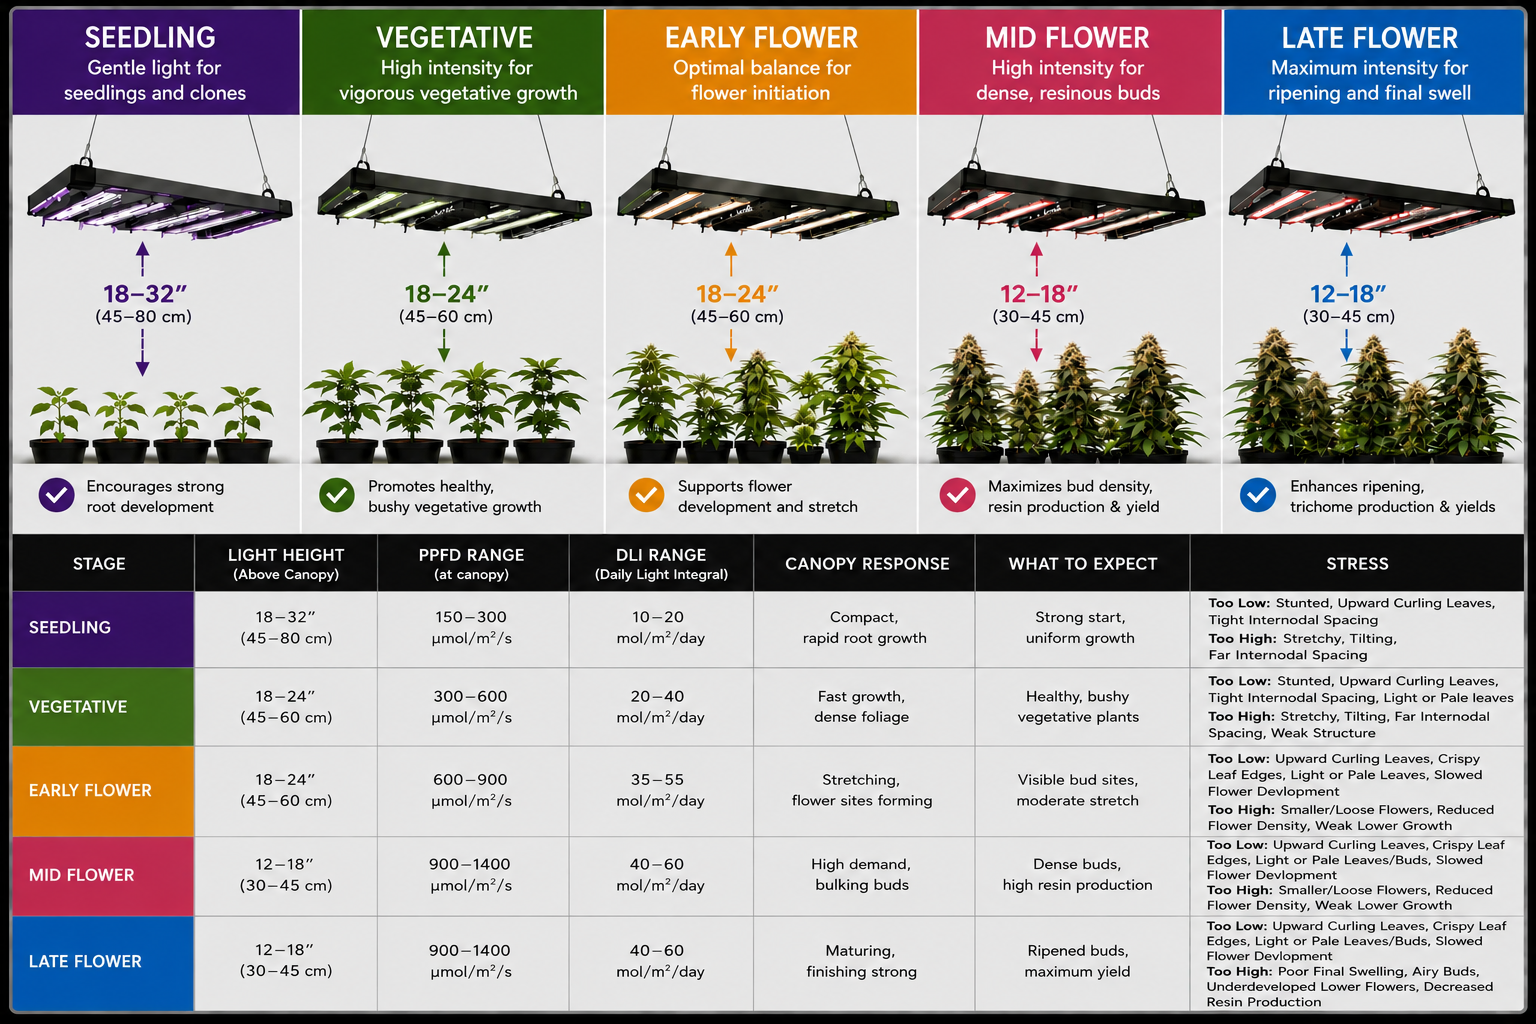
Lighting Intensity
Light height alone does not determine how much light your plants receive. Every LED fixture has a different output, optics, spread, efficiency, and dimming capability, meaning two lights hung at the exact same height can produce dramatically different PPFD values. For that reason, the recommended hanging heights should be used as a starting point—not a fixed rule. The best approach is to measure PAR/PPFD at the canopy using a PAR meter, then adjust your fixture’s height or dimming level until you reach the target PPFD and DLI for your plant’s current growth stage. Measuring and fine-tuning your lighting ensures every plant receives the optimal amount of usable light, resulting in healthier growth, improved efficiency, and consistently higher-quality harvests.
Optimal Airflow Setup
This airflow configuration creates a continuous, efficient circulation pattern that keeps the entire canopy supplied with fresh air while quickly removing excess heat and humidity. The lower fan pushes cool air upward through the dense flowering canopy, while the upper fan, located on the opposite side of the tent, pushes air back toward canopy, creating an air vortex that pushes warm, humid air towards the carbon filter and inline exhaust system, eliminating stagnant air pockets. Combined with negative pressure and continuous exhaust, this setup strengthens stems, improves transpiration and CO₂ exchange, reduces the risk of mold and pests, and helps maintain a stable environment for maximum plant health, resin production, and yield.
Substrate Mix and Fill Levels
Filling a substrate container to approximately 1–2 inches below the top while incorporating 30–40% perlite creates an ideal balance between root-zone volume, drainage, aeration, and moisture retention. Leaving a small amount of space at the top provides room for watering without overflow, allows for top dressing, and maintains proper airflow and temperature at the surface, while the added perlite increases pore space and oxygen around the roots, helping prevent compaction and waterlogged conditions. Together, this setup promotes a well-aerated, evenly moist root zone that supports vigorous root development, nutrient uptake, and healthy plant growth throughout the cultivation cycle.
Container Sizing
Different plant sizes require different container sizes because the root system needs enough room to support the plant without leaving excessive unused medium. Smaller plants generally perform better in smaller containers, which helps the root zone dry at an appropriate rate and reduces the risk of overwatering, while larger plants need additional root volume to support bigger canopies, greater nutrient uptake, and stronger overall growth. Choosing the right container size helps create the right balance between root development, moisture management, nutrient availability, and plant size—giving your plants the root zone they need to reach their full potential.
dli, vpd, ec, and training
Mastering The 4 Keys
Successful cannabis cultivation is built on four core fundamentals: lighting, environment, nutrition, and training. When these four elements work together, plants can reach their full genetic potential, producing healthier growth, stronger structure, and higher-quality harvests.
Lighting: Daily Light Integral (DLI) & PAR
Environment: Vapor Pressure Deficit (VPD)
Nutrition: pH & Electrical Conductivity (EC)
Training
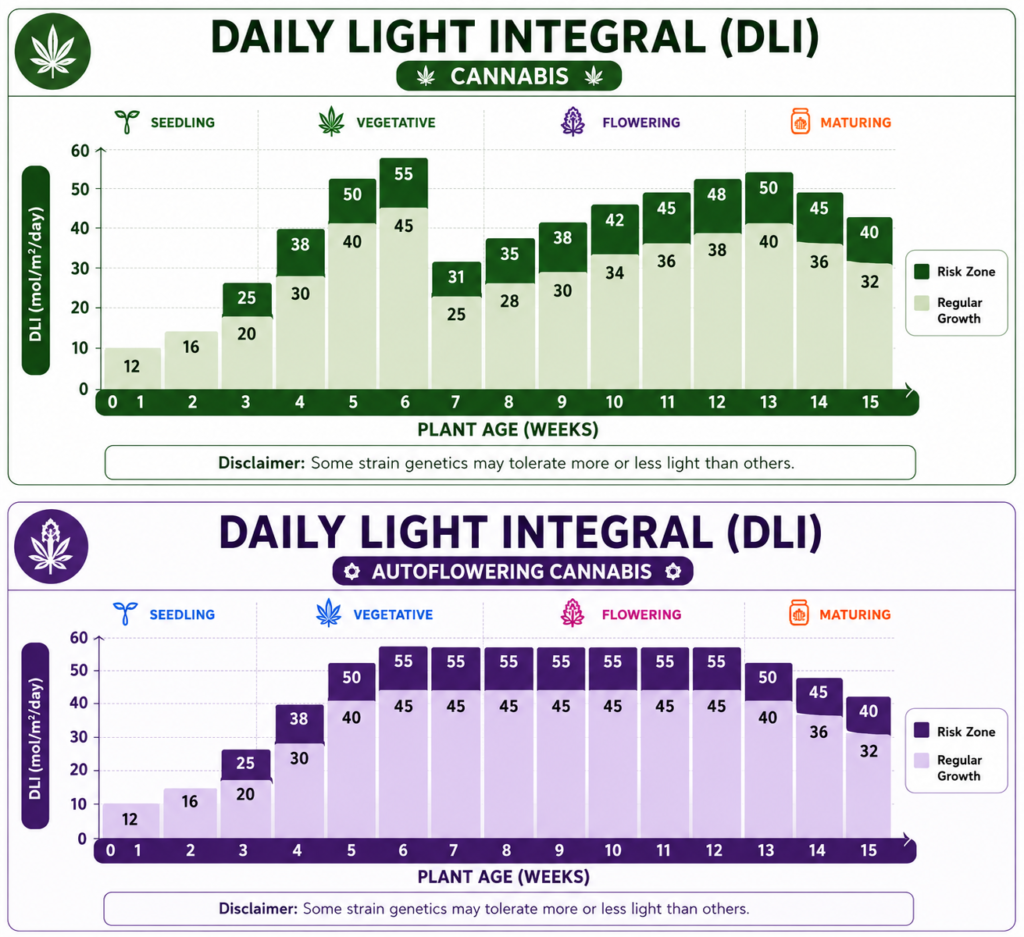
Daily Light Integral (DLI) and PPFD
Light is the primary driver of cannabis growth, because it provides the energy the plant uses for photosynthesis. Through photosynthesis, the plant converts light energy, water, and carbon dioxide into the sugars and carbohydrates needed to build leaves, stems, roots, flowers, and ultimately produce biomass. Too little light can result in slow growth, weak structure, reduced branching, and poor flower development, while excessive DLI can cause light stress and place unnecessary demands on the plant’s ability to process the available energy. As cannabis progresses from seedling through vegetative growth and flowering, its ability to utilize light changes, so the target DLI should be adjusted accordingly.
PPFD (Photosynthetic Photon Flux Density) measures how much usable plant light is reaching the canopy at a specific moment. It is measured in µmol/m²/s and tells you the intensity of the light your plants are receiving right now.
DLI (Daily Light Integral) measures the total amount of usable plant light your plants receive over an entire day. It is measured in mol/m²/day and takes both light intensity and the number of hours the lights are on into account.
In simple terms:
PPFD = How much light your plants are receiving right now.
DLI = How much total light your plants receive throughout the day.
PPFD and DLI work together. You use PPFD to measure and adjust your light intensity, while DLI helps you determine whether your plants are receiving the appropriate total amount of light for their stage of growth.
DLI Forumla:
DLI = PPFD × Hours of Light × 0.0036
The same PPFD does not always result in the same DLI because DLI depends on both light intensity and how long the light is on.
For example, 800 PPFD under an 18-hour light schedule produces approximately 51.8 DLI, while the same 800 PPFD under a 12-hour schedule produces approximately 34.6 DLI.
This is why PPFD should always be considered alongside your light schedule. PPFD tells you how intense the light is, while DLI tells you how much total light the plant receives over the entire day.
Cannabis plants don’t need the same amount of light from seedling to harvest. As the plant grows larger and develops more leaves, roots, and photosynthetic capacity, it can utilize more light. This is why DLI should gradually increase as the plant progresses through each stage of growth.
The important thing to remember is that DLI should match the plant’s ability to use light. Too little light can limit growth, while too much light can stress the plant.
Autoflowers and DLI
Autoflowering cannabis plants can have different DLI requirements because they are not dependent on a specific light schedule to trigger flowering. Unlike photoperiod plants, autoflowers can remain on longer daily light schedules while continuing to develop through their life cycle. This allows growers to spread the plant’s daily light requirement over more hours instead of relying on very high PPFD for a shorter photoperiod. For example, the same DLI can be achieved with lower PPFD over a longer day.
Because autoflowers have a relatively short life cycle and limited time to build a canopy, maintaining an appropriate DLI throughout their development can help support steady growth without relying on excessive light intensity.
Start lower, gradually increase DLI as the plant develops, and maintain an appropriate level through flowering. Review the below diagrams for more DLI and Light Height settings.
Lighting Schedule
Photoperiods
For photoperiod plants, the light schedule changes significantly between the vegetative and flowering stages. During vegetative growth, photoperiod plants generally perform well with 18 or more hours of light per 24-hour period, while flowering is typically initiated by providing a 12-hour light / 12-hour uninterrupted dark cycle.
There are three common schedules for vegetative growth:
24/0 — 24 hours light, 0 hours darkness: Provides the maximum daily light exposure and eliminates a dark period. Plants can grow very aggressively under this schedule when environmental conditions and light intensity are properly managed
20/4 — 20 hours light, 4 hours darkness: A strong balance between high daily light exposure and providing a short dark period. This is an excellent option for vigorous vegetative growth while slightly reducing energy consumption and daily light load compared with 24/0.
18/6 — 18 hours light, 6 hours darkness: The traditional vegetative schedule and a reliable choice for healthy, vigorous growth. The extended dark period gives the plant a consistent rest period while still providing plenty of light for photosynthesis.
More hours of light does not automatically mean more growth. The plant’s total daily light integral (DLI), PPFD, CO₂ availability, temperature, humidity, root-zone conditions, and nutrition all need to be balanced. Increasing the photoperiod while keeping the same PPFD increases DLI, so light intensity may need to be adjusted to prevent excessive light exposure.
Flowering Growth
When you’re ready to initiate flowering, photoperiod plants are typically switched to:
12/12 — 12 hours light, 12 hours darkness
The uninterrupted 12-hour dark period provides the photoperiod signal that triggers flowering in most photoperiod cannabis cultivars. Once flowering begins, maintaining a consistent 12/12 schedule is important. Avoid interruptions or light leaks during the dark period, as inconsistent darkness can interfere with the plant’s flowering response.
Autoflowers
Autoflower plants differ from photoperiod plants because they do not require a change to 12/12 to initiate flowering. Instead, their life cycle is primarily determined by age and genetics. Because of this, growers can maintain a long daily light period from seedling through flowering.
Three common Autoflower schedules are:
- 24/0 — 24 hours light, 0 hours darkness: Provides the maximum possible daily light exposure. This can support rapid growth when light intensity, temperature, and environmental conditions are properly managed, but it also increases energy consumption and the plant’s total daily light exposure.
- 20/4 — 20 hours light, 4 hours darkness: A popular balance for autoflowers. It provides a high DLI while giving plants a short uninterrupted dark period and reducing energy consumption compared with 24/0.
- 18/6 — 18 hours light, 6 hours darkness: A more conservative schedule that still provides ample light for vigorous growth while allowing a longer dark period and reducing electricity use.
The most important factor is not simply the number of hours the light is on, but the total DLI delivered to the plant. Increasing the photoperiod increases DLI at the same PPFD, so light intensity should be adjusted accordingly to keep the plant within an appropriate range.
Adjust the Light Schedule to Your Environment
Cold Environment — Consider 24/0
If your grow space struggles to maintain temperature, running the lights 24/0 can help provide a continuous source of heat. LED fixtures produce less heat than older HID lighting, but the electrical energy they consume still contributes heat to the room. Keeping the lights on continuously can help prevent large nighttime temperature drops and maintain a more stable root-zone and ambient temperature. This can be particularly useful during colder seasons or in spaces where the temperature falls significantly whenever the lights turn off.
Warm Environment — Consider 18/6
If your grow space becomes too warm, an 18/6 schedule can provide a longer cooling period. You can strategically schedule the 6-hour dark period during the warmest part of the day, reducing the amount of heat being produced when the room is already at its hottest. For example, if your room experiences its highest temperatures in the afternoon, you could have the lights turn off during that period and turn back on during the cooler evening and overnight hours.
Humidity Spikes — Consider Longer Light Periods
Lights can influence humidity because plant transpiration and room temperature change throughout the light/dark cycle. In some environments, humidity rises significantly when the lights turn off because temperatures fall while moisture remains in the air. If your room experiences problematic nighttime humidity spikes, a schedule such as 20/4 or 24/0 may help reduce the magnitude of those fluctuations. With 24/0, there is no light-off period for the room temperature to drop sharply, which can make maintaining a stable temperature/RH relationship easier. However, lighting should not be used as a substitute for proper ventilation or dehumidification when humidity is consistently excessive.
High Electricity Rates — Schedule Around Peak Pricing
If your utility uses time-of-use electricity pricing, you can potentially schedule the lights to operate during off-peak hours when electricity is cheaper. For example, with an 18/6 schedule, you could place the 6-hour dark period during the most expensive electricity window. This allows the lights to operate primarily during cheaper hours while maintaining the same total photoperiod. This can be especially valuable with high-wattage LED fixtures that consume substantial electricity over long operating periods.
Managing Summer Heat:
During hot weather, schedule the dark period around the hottest portion of the day. This reduces the heat load on your air conditioner and can make temperature control considerably easier.
Reducing HVAC Load:
Lighting and HVAC systems work together. If your lights substantially heat the room, scheduling them during cooler outdoor temperatures can allow the HVAC system to remove heat more efficiently.
Avoiding Large Temperature Swings:
If your room experiences significant differences between lights-on and lights-off temperatures, a longer photoperiod can help create a more stable environment.
Working With Natural Room Temperatures:
You can choose your light schedule around the natural temperature cycle of your building. For example, lights can run overnight when the room is naturally cooler during summer or during the daytime when additional heat is beneficial during winter.
Backup Equipment Limitations:
If your environmental equipment has limited capacity, reducing the lighting period can reduce heat production and make it easier for your ventilation, air conditioning, or dehumidification equipment to keep up.
The goal isn’t necessarily to run the maximum number of light hours. The goal is to choose a schedule that provides an appropriate DLI while keeping temperature, humidity, VPD, and energy consumption within desirable ranges.
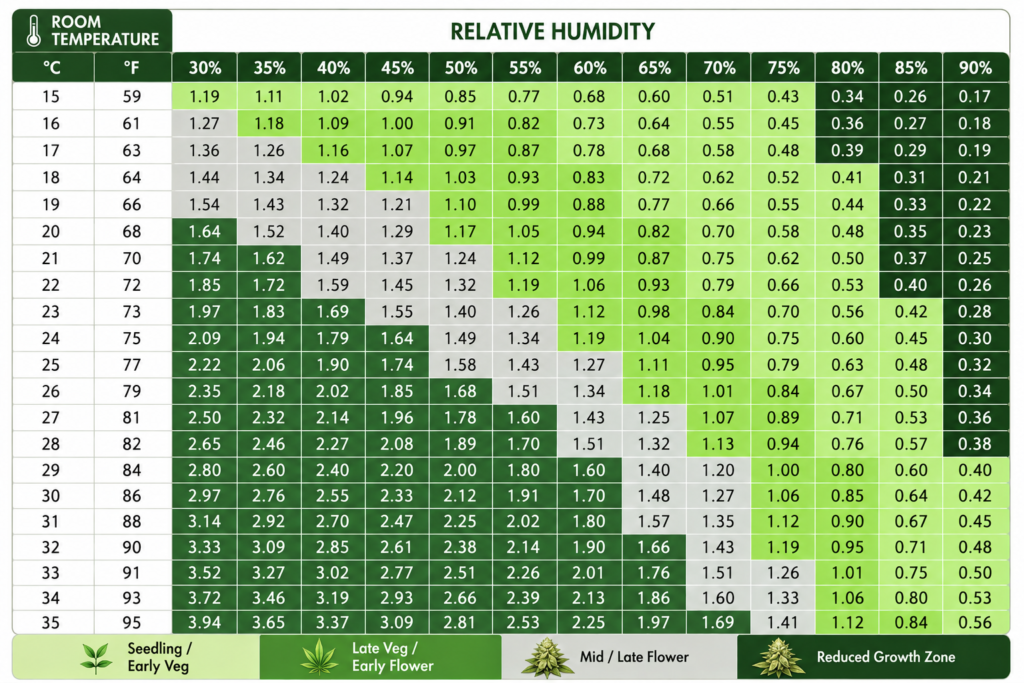
Vapor Pressure Deficit (VPD)
VPD is a measurement of how strongly the air pulls water from a plant. It is expressed in kilopascals (kPa). More specifically, VPD is the difference between:
The amount of moisture the air currently contains
The maximum amount of moisture the air could hold at saturation
Temperature and relative humidity both affect VPD. That means 70°F at 60% RH and 80°F at 60% RH do not produce the same VPD.
Instead of thinking only:
“My temperature is X and my humidity is Y.”
VPD allows you to think:
“How much drying demand is the environment placing on the plant?”
That drying demand directly influences transpiration.
Plants constantly move water through themselves:
Roots → stem → leaves → atmosphere
This movement is driven partly by transpiration. Water evaporates from the leaf through microscopic openings called stomata.
A healthy amount of transpiration helps support:
Water uptake
Nutrient transport
Calcium movement
Magnesium and other mineral transport
Leaf cooling
Gas exchange
Photosynthesis
Overall growth and metabolism
VPD helps describe whether the environment is creating too little, an appropriate amount, or too much transpiration demand.
Low VPD
When the air is already humid relative to the leaf, there is little incentive for water to evaporate.
Transpiration slows down.
Higher VPD
When the air is relatively dry compared with the leaf, the atmosphere pulls more moisture from the leaf.
Transpiration increases.
The goal is not simply to maximize transpiration. The goal is to maintain a VPD where the plant can:
Transpire consistently
Maintain healthy stomatal function
Move water and nutrients effectively
Avoid excessive water loss
Avoid stress and stomatal shutdown
Think of VPD as the throttle controlling atmospheric demand on the plant.
Leaf temperature is more important than room temperature
A major limitation of traditional VPD charts is that they often use air temperature. But the water is evaporating from the leaf, not from the air-temperature sensor. A powerful LED fixture can change leaf temperature significantly. Depending on lighting, airflow, radiant heat, and transpiration, the leaves may be:
Cooler than the room
Approximately the same temperature as the room
Warmer than the room
This difference is called the leaf temperature offset.
Leaf Offset Temperature Calculation:
Leaf Temperature − Air Temperature = Leaf Offset
For example:
Air temperature: 78°F
Average leaf temperature: 76°F
76 − 78 = -2°F leaf offset
Pro Tip: Use your leaf temperature when comparing to a -0 offset VPD chart or set your leaf offset temperature in your AC Infinity Controller under settings.
germination, seedling, veg, flower, and harvest
pH and Electrical Conductivity (EC)
Successful cannabis cultivation is built on four core fundamentals: lighting, environment, nutrition, and training. When these four elements work together, plants can reach their full genetic potential, producing healthier growth, stronger structure, and higher-quality harvests.
pH
pH measures how acidic or alkaline your root-zone solution is. The pH scale runs from 0 to 14:
Below 7.0: Acidic
7.0: Neutral
Above 7.0: Alkaline
For plants, pH is important because it directly affects nutrient availability. You can have plenty of nutrients in your soil or nutrient solution, but if the pH is outside the appropriate range, the roots may have difficulty absorbing some of them. This can create what looks like a nutrient deficiency even when nutrients are physically present. This is commonly called nutrient lockout. Think of it like this:
Nutrients in the root zone = food in the refrigerator
Correct pH = the ability to open the refrigerator
If pH is too far outside the appropriate range, certain nutrients become less available.
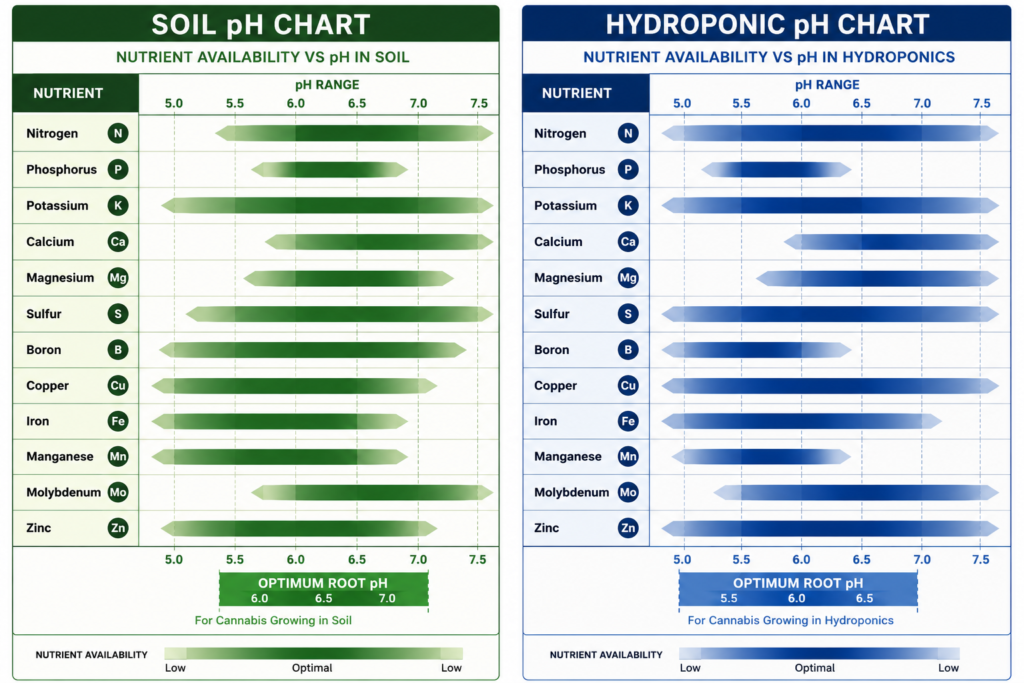
The main difference between soil and coco/hydroponic growing is that they naturally operate at different pH levels because nutrients behave differently in each root-zone environment.
🌱 Soil: pH 6.0–7.0
Soil generally performs best with a slightly acidic to neutral pH of about 6.0–7.0, with roughly 6.3–6.7 being a strong general target. Soil contains organic matter, minerals, microorganisms, and a natural buffering capacity. This means the root zone can tolerate a wider pH range without nutrients immediately becoming unavailable. At different points within 6.0–7.0, different nutrients become more or less available:
Nitrogen: generally well available through this range
Phosphorus: good availability around the mid-6s
Potassium: generally available across the range
Calcium & Magnesium: increasingly favorable toward the upper portion
Iron, manganese & zinc: more available toward the lower portion
The wider range is one reason soil is generally more forgiving of small pH fluctuations.
💧 Coco / Hydroponics: pH 5.5–6.5
Coco and hydroponic systems generally operate at a lower pH of approximately 5.5–6.5, with 5.7–6.1 being a useful general target for coco.
In hydroponics, nutrients are delivered directly to the roots in solution rather than being held and buffered by a complex soil matrix. Maintaining the appropriate pH is therefore particularly important for keeping nutrients soluble and available. A good way to think about it:
Soil → 6.0–7.0
Coco/Hydro → 5.5–6.5
The ranges overlap around 6.0–6.5, but the center of the ideal range is different. For example, a soil grow might commonly target 6.5 pH, while a coco grow might target 5.8–6.0 pH.
pH controls nutrient availability. If the root-zone pH moves too far outside the preferred range, certain nutrients can become chemically unavailable even though they are physically present. So a plant can have plenty of iron, calcium, phosphorus, etc. in the growing medium but still exhibit a deficiency because the pH is preventing the roots from accessing it. This is why managing pH is critical for healthy growth.
Electrical Conductivity (EC)
Electrical Conductivity measures how well a solution conducts electricity. The more dissolved mineral salts and ions present in the water, the higher the EC. In plant nutrition, EC gives you a practical estimate of how concentrated your nutrient solution is. Simple example:
0.1 EC = Very little dissolved mineral content
1.0 EC = Moderate nutrient concentration
2.0 EC = Much stronger nutrient concentration
EC does not tell you exactly which nutrients are present. Two nutrient solutions could both measure 1.5 EC while containing completely different nutrient ratios. EC tells you approximately:
How much dissolved ionic material is in the solution, not whether the nutrient balance is correct. Measuring EC helps you avoid both extremes:
EC too low = underfeeding
If nutrient concentration is too low, the plant may not receive enough nutrients to support its growth rate. Possible symptoms include:
Slow growth
Pale leaves
Lower vigor
Reduced leaf size
Lower overall production
Plants that appear hungry despite receiving frequent irrigation
A plant may look deficient for reasons other than insufficient fertilizer. Before increasing EC, you should always consider:
pH
Root health
Temperature
Irrigation frequency
Light intensity
VPD
EC too high = overfeeding
Higher EC does not automatically mean faster growth. Eventually, the nutrient solution becomes concentrated enough that it can create excessive osmotic pressure around the roots. The plant then has to work harder to take up water. This can lead to:
Leaf burn
Clawing
Reduced growth
Slower water uptake
Root stress
Salt accumulation
Nutrient antagonism
Apparent deficiencies despite high nutrient levels
The most extreme situation is when the root zone becomes so concentrated that water uptake is significantly restricted.
In other words: A plant can be sitting in nutrients and still struggle to absorb water.
A useful way to think about feeding strength is:
Higher light + healthy roots + strong transpiration = potentially higher nutrient demand
But EC should not be increased automatically just because the plant is larger. A plant under stress may require a lower EC even if it is physically large.
Using runoff EC to understand the root zone in Hydroponics
For coco, measuring both input EC and runoff EC can provide useful information.
Example 1: Runoff EC is much higher than input
Input: 1.8 EC
Runoff: 2.6 EC
This may indicate:
Salt accumulation
Insufficient runoff
Excessive drybacks
Feed concentration that is too high for current conditions
The root-zone EC may be climbing.
Example 2: Runoff EC is close to input
Input: 1.8 EC
Runoff: 1.9 EC
This generally suggests a more stable root zone.
Example 3: Runoff EC is lower than input
Input: 1.8 EC
Runoff: 1.3 EC
The plant may be consuming nutrients faster than they are accumulating, or the medium may not yet be fully saturated with the current feed.
Cannabis nutrient demand generally follows a gradual rise-and-fall curve throughout its life cycle. EC should usually follow the same pattern: low in the seedling stage, gradually increasing through vegetative growth and flowering, then often decreasing again as the plant reaches final maturation.
Seedling: Low EC
Young seedlings have:
Small, undeveloped root systems
Low transpiration rates
Limited nutrient demand
Small leaf area
They do not need a strong nutrient solution to support growth. In fact, a high EC can create excessive osmotic pressure around the roots, making it harder for a young plant to take up water.
The goal during this stage is to provide enough nutrition for healthy development without overwhelming the root system.
General trend: Low EC → gradually increase as roots and growth accelerate.
Vegetative growth: Increasing EC
As the plant grows, several things happen:
The root system expands
Leaf area increases
Transpiration increases
Photosynthesis increases
Growth accelerates
The plant is now capable of moving and utilizing more water and nutrients.
This is why EC can generally be increased gradually throughout vegetative growth. A rapidly growing, healthy plant often requires more nutrients than a small seedling.
The key is to increase EC based on plant development and response, rather than jumping immediately to a high concentration.
General trend: Moderate EC → gradually increasing as the plant gets larger and more vigorous.
Transition and flowering: Highest nutrient demand
During the transition into flower and through early-to-mid flower, the plant often reaches its greatest nutrient demand.
It is simultaneously supporting:
Continued structural growth and stretch
New flower development
Increased biomass
High photosynthetic activity
High water and nutrient movement
This is often where the plant can tolerate or require its highest EC levels, assuming:
The roots are healthy
pH is in range
VPD is appropriate
Irrigation is properly managed
There is no excessive salt accumulation
The peak does not necessarily occur at the exact same week for every cultivar. Some plants peak during the transition and early flower, while others maintain strong demand further into mid flower.
General trend: EC rises toward peak demand during the most active growth and flower-building period.
Key Takeaways: Measure EC to make sure your plant is receiving the correct amount of nutrients. Measure your runoff and compare it to your feed EC, see if you need to increase or decrease your nutrient solution.
Watering Methods
Automated Watering Systems
There are a number of automated watering systems available such as basic bottom feeding planters but the best system to use would be Auto Pot. AutoPot systems are excellent for watering cannabis because they provide a simple, gravity-fed, demand-based irrigation system that can keep the root zone consistently supplied with water and nutrients. Using an Auto Pot or other automated watering system eliminates the hardships brought from hand watering and ensures your plant has optimal water uptake.
Soil Watering Methods
When growing in soil, the goal is to create a healthy wet-to-dry cycle. Unlike coco, which is often kept consistently moist, soil generally benefits from being watered thoroughly and then allowed to partially dry before the next watering. Two of the easiest ways to determine when it’s time to water are the knuckle test and lifting the pot.
The Knuckle Test
Push your finger about 1–2 inches into the soil, roughly to your first or second knuckle.
Moist soil: Wait before watering.
Slightly dry: The plant may be approaching watering time.
Dry at knuckle depth: It is usually time to water.
This method works best as a quick check, although the surface of the soil can sometimes dry out faster than the root zone underneath.
Pick Up the Pot
One of the most reliable methods is simply learning the weight of the container. After thoroughly watering, lift the pot and notice how heavy it feels. As the plant uses water and moisture evaporates, the pot will become progressively lighter.
Heavy pot → plenty of moisture
Moderately light pot → approaching watering time
Noticeably light pot → usually ready to water
Over time, this becomes one of the easiest ways to judge moisture without disturbing the soil or relying on a fixed watering schedule.
How to Water Soil
When the soil is ready:
Water slowly and evenly across the surface rather than pouring everything into one spot.
Start near the base of the plant and gradually work outward toward the edges of the container.
Allow the water time to soak into the soil instead of immediately running down the sides.
Continue until the root zone has been thoroughly hydrated. Depending on the soil mix and growing method, a small amount of runoff may occur.
The ideal approach is not to water on a strict calendar. Let the plant and the weight of the pot tell you when it is time to water.
Hydroponics Watering Methods
Hydroponic media such as coco coir, rockwool, and other soilless substrates should not be watered the same way as soil. The goal is usually not to allow the medium to dry significantly between waterings. Instead, the goal is to maintain a consistent supply of water and nutrients while preserving adequate oxygen around the roots.
In soil, growers often use a wet-to-dry cycle, allowing the container to become noticeably lighter before watering again.
In hydroponic media, especially coco, allowing the root zone to become too dry can cause the concentration of dissolved fertilizer salts around the roots to increase. As water is removed by the plant and evaporation, the remaining nutrients become more concentrated. This can lead to:
Drying media → rising root-zone EC → salt accumulation → nutrient imbalance or root stress
Water to Runoff
A common strategy for drain-to-waste hydroponic growing is to apply enough nutrient solution to produce approximately 10–20% runoff, with around 20% often used when the goal is to provide a stronger safety margin against salt accumulation. That runoff helps:
Flush excess fertilizer salts from the root zone.
Replace old solution with fresh nutrient solution.
Keep root-zone EC closer to the EC being applied.
Reduce the risk of nutrient buildup over time.
For example, if you feed 1 gallon, you might target roughly 0.1–0.2 gallons of runoff, depending on the medium, container size, plant size, and irrigation strategy.
High-Frequency Irrigation
As plants become established, hydroponic systems can benefit from multiple smaller irrigation events throughout the day rather than one large watering. Instead of:
One large watering → long dry period
High-frequency irrigation provides:
Small feeding → stable moisture → nutrient uptake → small feeding again
When properly managed, frequent irrigation can maintain a more stable root-zone environment and often supports faster growth and higher yields than low-frequency watering. This is especially true in highly aerated media such as coco and rockwool, where frequent fertigations can maintain water availability without necessarily depriving the roots of oxygen.
The key is balance: more frequent irrigation does not simply mean keeping the medium constantly saturated. The irrigation frequency and volume should be adjusted based on plant size, environmental demand, container size, and the water-holding capacity of the substrate.
Training
Plant training is the process of manipulating a cannabis plant’s growth to create a more even, productive canopy. Plant training is used to control the shape, size, and structure of a cannabis plant so that the plant can make better use of available light and growing space. Different techniques accomplish different things, and the best results usually come from combining methods appropriately rather than using every technique on every plant. Instead of allowing the plant to grow naturally with one dominant central cola, training can distribute growth across multiple branches and position more flowers in the optimal light zone. Below is a quick list of the different training methods and when to use them, view the training pages for more detailed information.
Transplanting
What it is: Moving a plant from a smaller container into a larger one as its roots develop.
Goal: Give the roots additional space to expand while maintaining healthy root-zone conditions.
A properly timed transplant can encourage continued vegetative growth and prevent a root-bound plant from becoming restricted.
Low Stress Training (LST)
What it is: Gently bending and securing stems and branches rather than allowing them to grow vertically.
Goal: Create a wider, flatter, more evenly distributed canopy.
LST can:
Reduce the dominance of the main stem
Expose more branches to light
Control plant height
Fill the footprint of a grow light
Improve canopy uniformity
Stress level: Low
Topping
What it is: Removing the growing tip of the main stem or a branch.
Goal: Redirect growth toward multiple lateral branches instead of one dominant central stem.
This can transform:
One dominant top → multiple primary tops
Topping is especially useful when you’re building a bushier plant or preparing a plant for LST or SCROG.
Stress level: Low-Moderate, depending on how vigorous the plant was prior to topping.
Selective Leaf Pruning
What it is: Removing individual leaves that are causing a specific problem.
Goal: Improve light penetration and airflow without significantly reducing the plant’s overall leaf mass.
Rather than removing large amounts of foliage, you selectively remove leaves that are heavily shading important growth or interfering with airflow.
Stress level: Low
Defoliation
What it is: Removing a larger number of fan leaves from the plant.
Goal: Manage canopy density, improve airflow, and allow more light to penetrate into the interior of the plant.
Defoliation should be strategic. Leaves are responsible for photosynthesis, so removing excessive healthy foliage can work against the plant.
Stress level: Low-Moderate, depending on how aggressively it is performed.
Lollipopping
What it is: Removing lower branches and small, poorly positioned growth while keeping the stronger upper branches.
Goal: Concentrate the plant’s productive growth toward the upper portion of the canopy.
This is particularly useful in indoor gardens where lower growth receives substantially less light than the upper canopy.
Result: Less energy and space devoted to poorly positioned flowering sites and a cleaner canopy.
Stress level: Moderate
Trellis / SCROG
What it is: Using a horizontal trellis to spread and support branches across the growing area.
Goal: Create a uniform, level canopy where more flowering sites are positioned within the optimal light zone.
Branches are gradually spread and tucked through the net as they grow.
SCROG is especially useful for maximizing the usable footprint of an indoor grow light.
Stress level: Low–Moderate, depending on how aggressively it is performed.
Supercropping
What it is: Carefully bending and manipulating a stem to temporarily damage its internal structure without completely breaking the branch.
Goal: Control overly dominant branches and bring them down to the level of the rest of the canopy.
Supercropping can also encourage stronger branch structure, but it is a considerably more stressful technique than LST.
Stress level: High
Mainlining
What it is: A structured training method involving repeated topping and branch manipulation to create a symmetrical plant with several primary branches.
Goal: Build a highly symmetrical, evenly distributed canopy with multiple dominant flowering sites.
Mainlining places a strong emphasis on structure and uniformity rather than simply allowing the plant to develop naturally.
Stress level: High
Recommended Training Strategy For Beginners:
Seedling: Start in small container, transplant when roots are visible through bottom and sides of the pot.
Early Veg: Top OR LST
Mid Veg: Continue LST if you did not top, Leaf Tucking
Late Veg: Defoliation, Trellis Net, Lollipop, Leaf Tucking
Early Flower: Trellis throughout stretch, Lollipop after stretch, Leaf Tucking
Mid Flower: Defoliation, Selective Leaf Pruning, Leaf Tucking
Late Flower: Selective Leaf Pruning, Leaf Tucking
|
Training Method
|
Growth Stage
|
When to Train
|
Learn More |
|---|---|---|---|
|
Transplanting |
Seedling – Early Veg |
Once roots establish the current container |
|
|
Low Stress Training (LST) |
Early Veg – Late Veg |
Once stems are flexible and have several nodes |
|
|
Topping |
Early Veg – Mid Veg |
Typically after 5–6 established nodes |
|
|
Mainlining |
Early Veg |
Start around the 3rd–6th node, with recovery between steps |
|
|
Super Cropping |
Mid – Late Veg |
When branches become established but are still actively growing |
|
|
Trellis Net / Scrog |
Late Veg – Mid Flower |
Install before the canopy becomes crowded, adjust branches as needed |
|
|
Defoliation |
Veg – Flower |
Selectively throughout; heavier sessions around transitions |
|
|
Lollipopping |
Late Veg – Early Flower |
Shortly before the flip and again after the stretch |
|
|
Selective Leaf Pruning |
Early Veg – Late Flower |
Anytime specific leafs are overcrowding or blocking flower sites |
|
|
Leaf Tucking |
Early Veg – Late Flower |
Anytime specific leafs are overcrowding or blocking flower sites |
germination, seedling, veg, flower, and harvest
Mastering Every Stage
Every stage of a cannabis plant’s life cycle requires a different approach. This section helps growers master the entire journey from seedling to harvest by understanding how to adjust nutrition, lighting, environment, and training as the plant develops. Learn how to optimize EC targets, DLI, training techniques, and environmental conditions throughout each stage, giving your plants exactly what they need to thrive from early growth through final maturation.
Germination
Three Cannabis Seed Germination Methods
1. 1% Hydrogen Peroxide + Paper Towel Method
This method begins with a diluted 1% H₂O₂ solution, made by mixing:
1 part 3% hydrogen peroxide + 2 parts water
Soak the seeds for approximately 12-36 hours (depending on age), then transfer them to a damp paper towel, single ply, folded in half. Keep the towel moist but not soaking wet, put the paper towel in a plastic zip lock bag, and place it in a warm, stable environment such as on top of a grow tent that has a light on.
Once the seed has opened and the taproot has emerged, carefully transfer it into your growing medium or starter plug.
Process:
1% H₂O₂ soak → 24–36 hours → damp paper towel → medium/starter
2. Water Soak + Paper Towel Method
For a simpler approach, soak the seeds in plain water for approximately 24–36 hours. After soaking, transfer them to a damp paper towel, single ply, folded in half. Keep the towel moist but not soaking wet, put the paper towel in a plastic zip lock bag, and place it in a warm, stable environment such as on top of a grow tent that has a light on.
Once the seed cracks and the taproot emerges, carefully transplant it into your growing medium or starter plug.
Process:
Water soak → 24–36 hours → damp paper towel → medium/starter
3. Direct-to-Medium / Starter Method
The most hands-off method is to plant the seed directly into its final medium, small starter container, or starter plug.
Plant the seed shallowly, keep the medium consistently moist without saturating it, and maintain warm conditions suitable for germination. The seed completes the entire germination process in place, eliminating the need to handle the delicate taproot.
Process:
Seed → directly into medium/starter → germination → seedling
Choosing Between Them
H₂O₂ + paper towel: Useful when you want a more controlled germination process and want to monitor the seed before planting.
Water + paper towel: A simple, widely used method that also allows you to monitor germination.
Direct to medium: The least hands-on method and avoids transplanting or handling the emerging taproot.
Use a Humidity Dome to Increase Germination Rates
A humidity dome helps maintain a warm, humid, and stable environment around the seedling. This is especially useful during germination and the first few days after emergence, when the root system is still small and developing.
Aim for approximately:
70–80% relative humidity
0.4–0.8 kPa VPD
75–84°F
Higher humidity reduces the rate at which the young seedling loses water through its leaves, allowing it to focus more of its energy on establishing roots.
A dome should not remain completely sealed indefinitely. Once seedlings emerge, gradually increase airflow and begin acclimating them to normal grow-room humidity. This helps prevent stagnant air and prepares the seedling for life outside the dome.
Maintain Proper Temperature
Cannabis seeds generally germinate best in a warm and stable environment. A target temperature of approximately 75–80°F (24–27°C) provides a favorable range for metabolic activity and germination.
Consistency is often more important than chasing an exact number. Avoid allowing the starter medium to become excessively cold or hot.
If necessary, a thermostat-controlled heat mat can help maintain root-zone temperature, especially when the surrounding room is cool. Monitor the temperature of the medium itself, since a heat mat can sometimes create temperatures significantly warmer than the surrounding air.
Use Gentle LED Lighting
Once seeds are planted or seedlings begin to emerge, provide a gentle LED light source above the humidity dome.
The goal is not to blast a newly emerged seedling with intense light. Start with approximately 100–200 PPFD, depending on the cultivar and setup, and adjust the fixture height or dimming level to maintain a gentle intensity.
A typical early lighting target is approximately:
PPFD: 100–200 µmol/m²/s
Photoperiod: 18–24 hours
DLI: approximately 6–17 mol/m²/day
|
Method
|
Target
|
Result
|
Learn More |
|---|---|---|---|
|
Seed Soak |
1% H2O2 |
Hydrates the seed and creates a cleaner germination environment |
|
|
Soak Duration |
12-36 Hours |
Allows time for the seed to absorb moisture and begin the germination process |
|
|
Temperature |
75-84 F |
Supports fast, consistent germination and early root development |
|
|
Humidity |
70-80% |
Reduces excessive moisture loss from newly emerged seedlings |
|
|
VPD |
0.4 – 0.8 kPa |
Creates a low-stress environment while the root system is developing |
|
|
PPFD |
100–200 µmol/m²/s |
Provides enough light for early growth without excessive intensity |
|
|
DLI |
6–17 mol/m²/day |
Provides enough light for early growth without excessive intensity |
|
|
Substrate |
Moist, not saturated |
Provides water for germination while providing oxygen for developing roots |
Seedlings
Describe delicacy of seedling
1. Seedling watering methods for soil/hydroponics/starters (rockwool/rapid rooters/etc…)
2. Seedling DLI / VPD, Optimal Temp, Training (none) chart
3. Seedling Tips & Mistakes
Early Veg
Describe delicacy of early veg, what to expect
1. watering methods for soil/hydroponics
2. Veg DLI / VPD, Optimal Temp, Training (Transplanting, LST, Topping, Leaf Tucking, selective leaf pruning) chart
3. Common deficincies/pests/other plant health info
4. Tips & Mistakes
Mid Veg
Describe delicacy of the stage, what to expect
1. watering methods for soil/hydroponics
2. Veg DLI / VPD, Optimal Temp, Training (Transplanting, LST, Topping, Leaf Tucking, selective leaf pruning, defoliation) chart
3. Common deficincies/pests/other plant health info
4. Tips & Mistakes
Late Veg
Describe delicacy of the stage, what to expect
1. watering methods for soil/hydroponics
2. Veg DLI / VPD, Optimal Temp, Training (LST, Leaf Tucking, selective leaf pruning, defoliation, lollipopping, trellis/scrog) chart
3. Common deficincies/pests/other plant health info
4. Tips & Mistakes
Early Flower “The Stretch”
Describe delicacy of the stage, what to expect, identifying male and females
1. watering methods for soil/hydroponics, slowly switching into bloom nutes
2. DLI / VPD, Optimal Temp, Training (LST, Leaf Tucking, selective leaf pruning, defoliation, lollipopping, trellis/scrog) chart
3. Common deficincies/pests/other plant health info
4. Tips & Mistakes
Mid Flower
Describe delicacy of the stage, what to expect
1. watering methods for soil/hydroponics
2. DLI / VPD, Optimal Temp, Training (Leaf Tucking, selective leaf pruning, defoliation, lollipopping, trellis/scrog) chart
3. Common deficincies/pests/other plant health info
4. Tips & Mistakes
Late Flower
Describe delicacy of the stage, what to expect
1. watering methods for soil/hydroponics
2. DLI / VPD, Optimal Temp, Training (Leaf Tucking, Selective Leaf Pruning, trellis/scrog, plant yoyos/stakes) chart
3. Common deficincies/pests/other plant health info
4. Tips & Mistakes
.
Harvesting
Describe when to harvest, describe cloudy/amber trichomes and their effects
1. Cutting the plant down
2. Drying methods, hang dry, vcure/cannatrol, other drying machines (myherbsnow, etc.., worst choice of the 3)
– airflow / humidifier setup diagram/info
3. How long to dry at different temps and humidity (use chart)
4. Curing methods, vcure/cannatrol, grove bags, mason jars
5. how long to cure
6. Tips and Mistakes
Nutrient Deficiencies, excess, pests, and diseases
Mastering Plant Health
Healthy plants start with knowing how to recognize problems before they become serious. This section teaches growers how to identify common pests, diseases, nutrient deficiencies, and plant-health issues by understanding the symptoms they produce. Learn to distinguish between similar-looking problems, identify their underlying causes, and take the appropriate corrective action—turning visual observation into one of your most valuable cultivation skills.
Deficiencies and Excess
Calcium
Magnesium
Nitrogen
Phosphorus
Potassium
Zinc
Manganese
Iron
Sulfur
Pests
Indoor:
Spider Mites
Thrips
Aphids
White Flies & Broad Mites
Fungus Nats
Outdoor:
Same as Indoor
Catepillars
Slugs & Snails
Fungus Nats
Diseases
Powdery Mildew (PM)
Botrytis (Bud Rot)
Root Rot
Fusarium
Septoria Leaf Spot
Tobacco Mosaic Virus (TMV)
Russet Mites
Beet Curly Top Virus
Hop Latent Viroid (HLVD)
fix mistakes before they happen
Top Tips and Mistakes
Great cannabis cultivation is built on consistency, observation, and attention to detail. This section highlights the practices that consistently lead to healthier plants and better harvests, while identifying common mistakes that can slow growth, reduce yields, or create unnecessary problems. Learn to recognize what your plants are telling you, make changes gradually, and focus on creating the right environment rather than constantly chasing perfection.
Tips
Top Tips
Mistakes
Top Mistakes
quick recap
TLDR Recap
Pick Genetics, Medium, and Equipment
Set up Equipment, airflow, lighting, and vpd important
Watering Methods
Germination (h2o2 > paper towel > sow, best method)
Seedling Care (Humidity Dome/Seedling Starters) recommended, VPD/DLI/EC
Veg Care and training recommended, VPD/DLI/EC
Stretch Care and training, keeping growth nutes going while slowly introducing bloom, VPD/DLI/EC
Flower Care and training
Harvest (recommeding 5% amber to chop)
Drying (Vcure/Cannatrol or hangdry with 60/60 or 70/60 as temps/rh)
Curing (Vcure/Cannatrol or GroveBags recommended)
Storing in mason jar or grove bag swapping out every few months